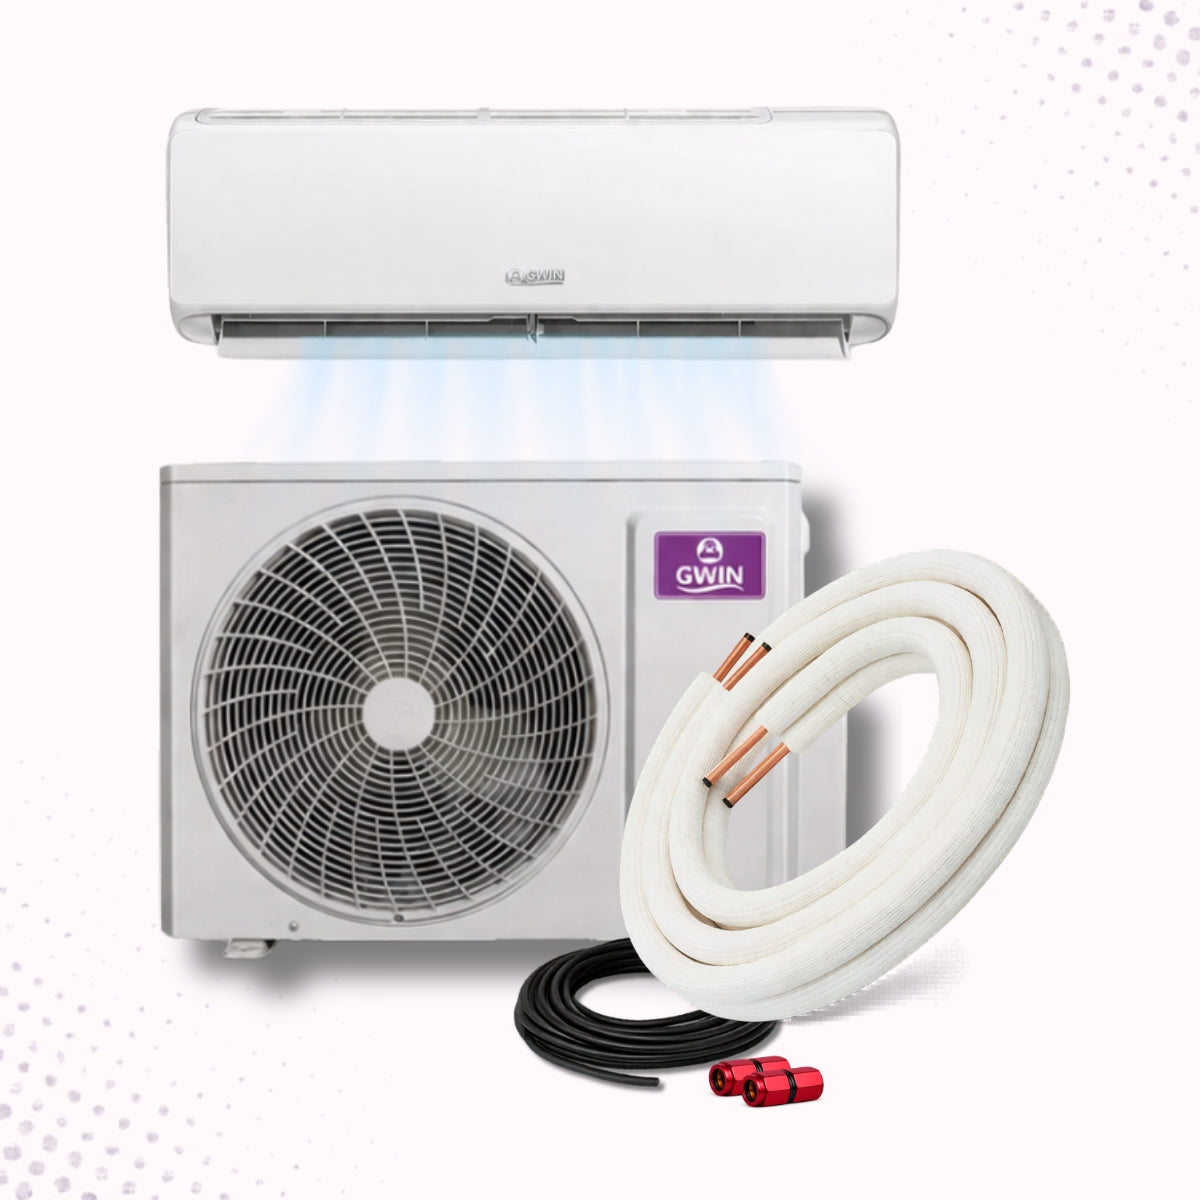
DIY Mini Split Systems
Everything You Need To Know About DIY Mini Splits And Why More Homeowners Are Choosing GWIN Assisted DIY
How GWIN Approaches DIY HVAC Differently
GWIN takes a different route.
Instead of designing around fixed, pre-charged lines, the system is built around the actual installation.
Each install uses only the line it needs. No extra. No coiling.
That allows for:
- Clean, direct routing
- Better placement flexibility
- A more finished, professional look
Removing excess line improves:
- Oil return to the compressor
- Refrigerant flow
- Overall system stability over time
The goal isn’t just to make installation easier. It’s to make the system work better after it’s installed.
Real homes don’t come in standard measurements. The system shouldn’t either.
The Next Step: Assisted DIY
DIY was the first shift. Assisted DIY is the refinement.
It keeps what works—and fixes what doesn’t.
- Mounting equipment
- Running line sets
- Basic installation
We have never once failed to place a tech at a customer’s door — including some of the most remote corners of the country. If we ever couldn’t find someone local, we’d drive one out. We’d book a flight. We’d lose money before we’d lose you. That’s not a policy. That’s how seriously we take every single order.
- System inspection
- Vacuuming
- Pressure testing
- Refrigerant charging
- Final performance verification
It removes the highest-risk parts of the process without taking control away from the homeowner.
You avoid:
- Specialized tools
- Technical guesswork
- Costly mistakes
And you gain:
- Proper system setup
- Verified performance
- Long-term reliability
Built for Long-Term Performance
GWIN systems are designed with durability in mind, not just install-day convenience.

Key Features:
- Corrosion-resistant (gold fin) coils
- Protected control boards
- Wide voltage tolerance (125–265V)
- Quiet operation
- Tech Included
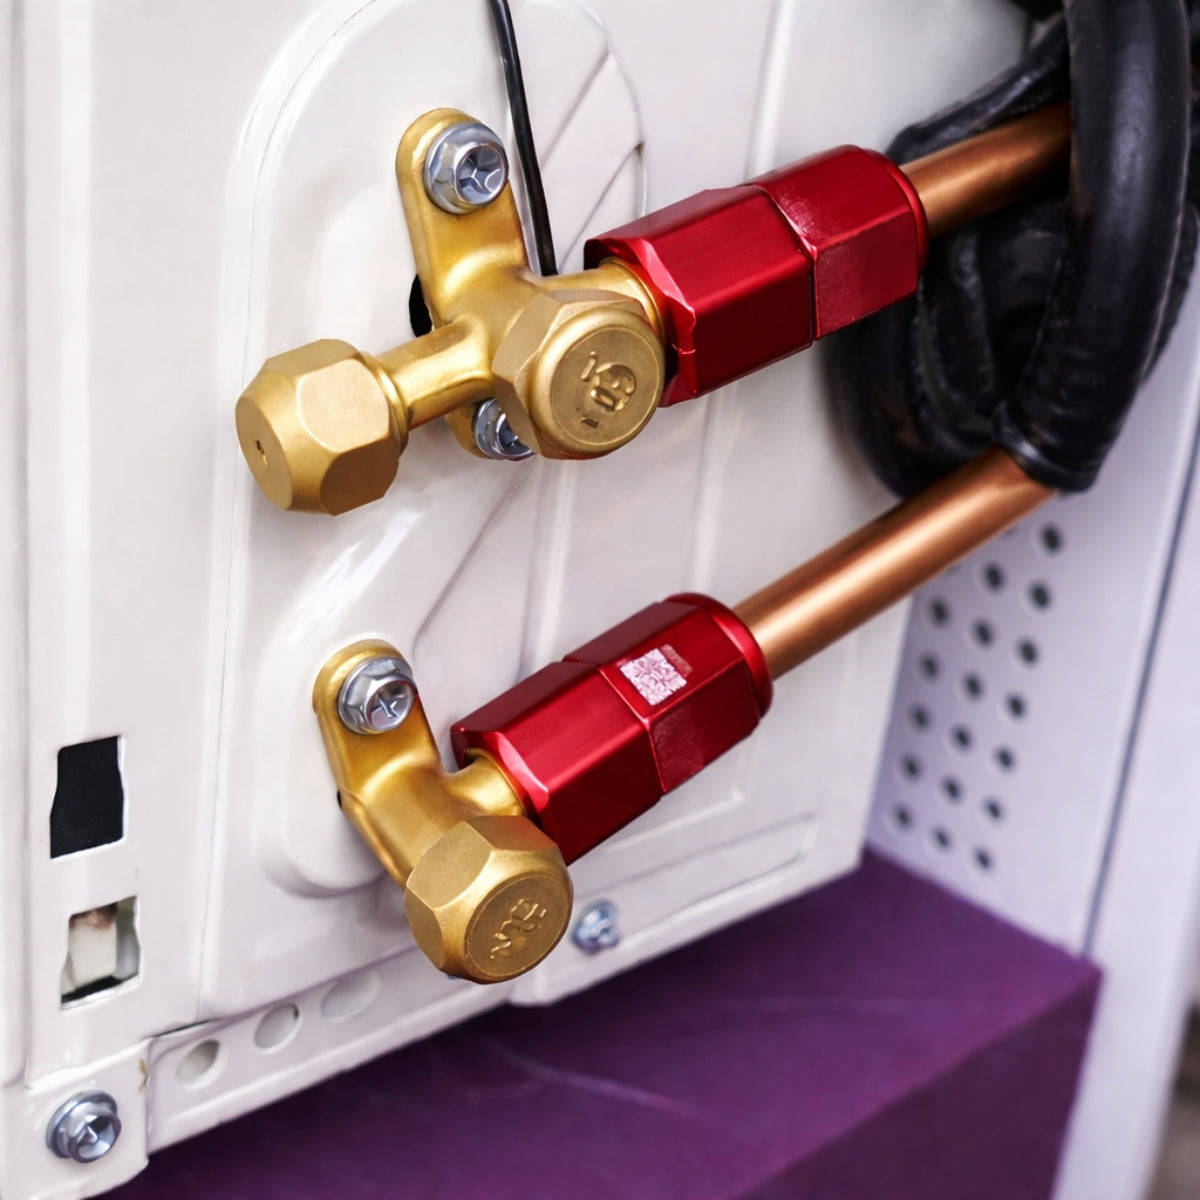
- Easy Connect Flareless Fittings
A Warranty That Matches Reality
One of the biggest gaps in DIY systems is what happens after installation.
- 10-year parts and compressor coverage
- 1-year labor and refrigerant coverage
That includes both the homeowner install and the professional commissioning process—no gray areas, no finger-pointing.
The Real Story Behind DIY Mini Splits
DIY mini splits changed the HVAC industry in a very real way.
Not long ago, installing a heating and cooling system meant hiring a licensed contractor—no exceptions. Between labor, markup, and scheduling, costs could climb quickly. For a lot of homeowners, especially those working on garages, additions, or outbuildings, that barrier was enough to put the whole project on hold.
DIY systems removed that barrier.
Suddenly, you could buy your own system, install it on your timeline, and avoid a large chunk of the cost. That shift opened the door for a lot of people who otherwise wouldn’t have considered upgrading at all.
But over time, a clearer picture has emerged.
Installing a mini split isn’t the hard part. Getting it to run properly for the next 10–15 years is.
That’s where most DIY systems start to show their limits.
What Is a DIY Mini Split?
A DIY mini split is a ductless heating and cooling system designed to be installed without a licensed HVAC technician.
At a basic level, every system includes:
- An outdoor condenser
- One or more indoor air handlers
- A refrigerant line set connecting them
- Electrical and drainage components
What makes a system “DIY” is how much of the technical work has been simplified. Traditional steps like brazing lines or charging refrigerant are reduced—or removed entirely.
Brands like MRCOOL helped bring this category into the mainstream. They made HVAC more accessible, but that accessibility comes with tradeoffs that aren’t always obvious upfront.
A common question: Do mini splits still work when it’s cold?
Modern inverter systems perform well below freezing, and many continue operating efficiently into the single digits.
That said, performance depends on:
- System design
- Proper sizing
- Installation quality
In colder climates, choosing the right system—and setting it up correctly—makes a significant difference in both comfort and efficiency.
One of the biggest long-term advantages of mini splits is efficiency.
Instead of cycling on and off like traditional systems, inverter-driven units adjust output continuously. That means they use only the energy needed to maintain temperature.
In practical terms, that often results in:
- Lower monthly energy bills
- More consistent comfort
- Less wear on the system
Compared to window units or baseboard heat, the difference can be substantial over time.
Mini splits are designed to be quiet—but there are still differences worth noting.
Indoor units are typically very quiet, making them well-suited for:
- Bedrooms
- Offices
- Living spaces
Outdoor units are also quieter than traditional central systems, but placement still matters—especially near patios or neighboring properties.
A well-installed system should blend into the background, not compete with it.
What It Takes to Install One (Realistically)
Most DIY systems are marketed as “simple to install.” And compared to traditional HVAC, that’s true. It's still a real project, but it's far easier than a traditional HVAC system installation.
A typical installation involves:
- Mounting the indoor unit securely on a wall
- Drilling a 2–3 inch wall penetration
- Routing the line set, drain line, and control wire
- Placing and securing the outdoor condenser
- Completing electrical connections
For many homeowners, this is a one-to-two day project depending on experience and site conditions.
Why DIY Systems Took Off

Lower upfront cost
You’re not paying for bundled labor, contractor overhead, or markup.

Control over the process
You choose the system, the placement, and the timing.

Faster timelines
No waiting on schedules—you can move at your own pace.
For the right project, those are real advantages. But they come with a catch.
Where DIY Mini Splits Start to Fall Short
Most of the issues with DIY systems don’t show up on day one. They show up later—sometimes years later.
Proper commissioning is one of the most important parts of any HVAC install. It includes:
- Pulling a vacuum to remove moisture
- Pressure testing the system
- Verifying refrigerant charge
When this step is rushed or skipped with a technology "work-around," the risks add up:
- Reduced efficiency
- Internal corrosion
- Compressor strain
- Shortened system lifespan
DIY systems that minimize or bypass this process entirely are also known to not last as long for these reason.
One of the most common surprises with mini splits is the electrical side.
Depending on the system, you may need:
- A dedicated 110V or 220V circuit
- A properly sized breaker
- An outdoor disconnect box
Some smaller systems can plug into standard outlets, but most require a dedicated line from your panel.
For homeowners comfortable with basic electrical work, this may be manageable. For others, this is often the point where bringing in an electrician makes sense.
Either way, it’s something to plan before you buy—not after.

Pre-Charged Line Sets
Pre-charged line sets are one of the main features that make DIY systems possible. They’re designed to be quick, simple, and approachable.
But they come with a constraint most people don’t think about until after installation.
Fixed Lengths Don’t Match Real Homes
These line sets come in preset lengths—usually 16 ft, 25 ft, or longer.
Homes don’t.
That mismatch almost always leaves extra tubing that has to be dealt with somehow.
What That Looks Like in the Real World
In most installs, the excess line ends up:
- Coiled behind the condenser
- Run along an exterior wall
- Laid horizontally near the unit
It works—but it’s not ideal.
Why That Matters
Mini splits rely on oil returning to the compressor for lubrication. Excess line—especially when coiled or uneven—can create low points where oil collects instead of circulating properly.
Over time, that can mean:
- Increased wear on the compressor
- Reduced efficiency
- Higher risk of long-term damage
Even a well-installed system can end up looking cluttered with visible coils of copper tubing.
Extra tubing is exposed. It can be stepped on, bent, or kinked—sometimes without you realizing it.
Because the line can’t be shortened, you’re often designing your layout around the line set—not the space.
HVAC systems are designed around controlled line behavior. Extra length—especially when loosely managed—can interfere with refrigerant flow and efficiency.
None of these issues are dramatic on day one. That’s why they’re easy to overlook.
But they matter over time.
Most DIY buyers are focused on getting the system installed and running.
That’s fair—that’s the promise.
But line set management isn’t an installation-day problem. It’s a long-term performance variable. And it’s rarely emphasized in marketing or product comparisons.
GWIN

MRCOOL

The Bottom Line
MRCOOL made DIY mini splits possible.
GWIN is built around what comes next.
If your priority is:
- The simplest possible installation with no technician involvement–MRCOOL may fit that approach
If your priority is:
- Long-term performance
- Clean installation
- Verified system setup
- Warranty coverage that includes the install
GWIN is designed for that outcome
Both solve the same problem—but in very different ways.
The right choice depends on what you value more:
maximum simplicity upfront, or greater confidence over time.
Why Builders and Remodelers Are Choosing GWIN
For contractors, HVAC isn’t just about equipment—it’s about coordination.
It’s one of the few parts of a project that’s often completely dependent on a separate trade—and that can create friction. Scheduling, availability, and handoffs all introduce variables into an already tight timeline.
GWIN approaches that differently.
It Fits Into the Build—Instead of Holding It Up
With traditional HVAC, large parts of the install can’t move forward until a licensed technician is on-site.
With GWIN, most of the work can happen as part of the normal build process.
Your team can:
Mount indoor units
Set condensers
Run line sets during rough-in
All on your schedule—not someone else’s.
The only step that requires a technician is the final commissioning:
Pressure testing
Vacuuming
Refrigerant charging
System verification
And that happens after everything is already in place.
So instead of coordinating multiple install days, you’re coordinating a single, focused final step.
The difference isn’t that GWIN removes the technician—it’s that it uses them more efficiently.
In a traditional setup:
HVAC crews may need multiple visits
Delays can stall other trades
Misalignment between rough-in and final install can cause rework
With GWIN:
Rough installation is completed upfront
The system is ready for commissioning when the tech arrives
There’s a clear, defined handoff point
It’s a more predictable process, which is what most contractors are really after.
GWIN systems are built to be installed by crews—not just HVAC specialists.
That shows up in a few key ways:
Cut-to-length line sets (no excess to manage or hide)
Flareless connections (no brazing or specialty tools)
Straightforward routing and layout
For a contractor, that means:
Less training required
Fewer install variables
More consistent results across projects
It turns HVAC rough-in into something that fits naturally alongside framing, electrical, and other trades.
This is where the model really separates itself.
Your team handles the physical install—but the most failure-prone parts of the system are still handled by a licensed technician.
That includes:
System evacuation
Leak testing
Refrigerant charging
Final verification
And importantly:
That process is backed by the manufacturer’s labor and refrigerant warranty.
So you’re not taking on full HVAC liability just because your team handled the install.
Instead:
The system is professionally validated
The install is covered
There’s a clear support path if something goes wrong
That’s a very different risk profile than fully DIY systems.
Labor is one of the biggest variables in HVAC pricing.
GWIN allows contractors to:
Handle the install portion in-house
Reduce reliance on outside crews
Avoid full-service HVAC labor costs
But without skipping the steps that actually protect the system long-term.
You’re not choosing between:
Saving money
Or doing it correctly
You get both—because the technical work is still done the right way.
At the end of the day, most contractors care about one thing:
Not having to come back.
GWIN systems are designed to reduce the issues that typically lead to callbacks:
Properly commissioned systems
Clean, correctly sized line sets
Durable components built for real-world conditions
Because from a project standpoint, the best install is the one that disappears once it’s done.
The traditional HVAC model assumes:
One trade handles everything
On their schedule
In their sequence
That doesn’t always align with how modern builds and remodels work.
GWIN fits a more flexible approach:
Your team moves the project forward
The technician handles the critical final step
The system is verified, covered, and complete
It’s not about removing the professional.
It’s about using them where they matter most—and not waiting on them for everything else.
How to Choose the Right Size Mini Split
Quick Sizing Guide
Up to 250sq ft – 6,000 btu
250–400sq ft – 9,000 btu
400–550sq ft – 12,000 btu
550–800sq ft – 18,000 btu
800–1100sq ft – 24,000 btu
1100–1400sq ft – 30,000 btu
1400–1700sq ft – 36,000 btu
Sizing is where most mistakes happen—and it has a bigger impact than brand or features.
The Simple Rule
Start with:
20–30 BTUs per square foot
That gives you a solid baseline.
Bigger Isn’t Better
Oversizing causes short cycling, which leads to:
- Poor humidity control
- Lower efficiency
- More wear on the system
Mini splits are inverter-driven—they adjust output as needed. A properly sized system will run more consistently and efficiently than an oversized one.
Adjust for Real Conditions
Increase capacity if you have:
- High ceilings
- Poor insulation
- Heavy sun exposure
- Heat-generating spaces (like kitchens or garages)
Single-Zone vs. Multi-Zone
Single-zone systems are ideal for one room or area. Simple and efficient.
Multi-zone systems can handle multiple rooms, but require more planning to size and balance correctly.
Common Mistakes to Avoid
- Oversizing “just to be safe”
- Ignoring insulation and environmental factors
- Guessing instead of calculating
- Trying to use one unit for multiple rooms
Why GWIN Helps You Get This Right
Sizing isn’t always intuitive, especially in real-world conditions.
GWIN provides guidance to:
- Match the system to your space
- Account for real variables
- Avoid expensive oversizing or undersizing mistakes
The Three Real Options
When it comes down to it, you have three paths:
Full DIY
Lowest cost, highest risk
Professional install
Most expensive, most predictable
GWIN Assisted DIY
A practical middle ground—cost savings without cutting corners
Permits, Codes, and When to Bring in Help
Depending on your location, some installations may require:
- Electrical permits
- Inspection for new circuits
- HOA approval
Even if permits aren’t required, many homeowners still choose to bring in help for specific parts of the install—especially electrical or final commissioning.
That’s part of what makes the assisted DIY model practical. You’re not locked into doing everything yourself—but you’re also not paying for more help than you need.
Placement and Drainage Matter More Than You Think
Even a perfectly sized system can underperform if it’s poorly placed.
A few things that make a big difference:
Indoor unit placement
- Avoid direct sunlight when possible
- Keep airflow unobstructed
- Position for even air distribution
Outdoor unit placement
- Allow for proper airflow clearance
- Avoid tight corners or enclosed spaces
- Consider snow levels, water runoff, and debris
Drainage
Mini splits remove humidity as they cool—and that water has to go somewhere.
Poor drainage can lead to:
- Interior leaks
- Mold issues
- Water damage
A simple, well-planned drain path prevents all of that.
Final Takeaway
If you’re considering a mini split, don’t just think about installation.
Think about how it will:
- Look
- Perform
- Hold up over time
The details that seem small—like excess line set—aren’t always small in the long run.
The best system isn’t the easiest one to install.
It’s the one that keeps working the way it should, year after year.
Maintenance: What You’ll Need to Do
Mini splits are relatively low maintenance, but they’re not maintenance-free.
The basics include:
- Cleaning or replacing air filters regularly
- Keeping the outdoor unit clear of debris
- Occasionally checking the drain line
With proper installation and routine care, these systems are designed to run reliably for years without major intervention.
FAQ
What size mini split do I need for a 500 sq ft room?
Around 12,000 BTUs in most cases, depending on insulation and sunlight.
Is it better to oversize a mini split?
No. Oversizing reduces efficiency and performance.
What happens if the system is too small?
It will run constantly and may struggle in extreme conditions.
Do DIY mini splits require vacuuming?
Yes. It’s critical for long-term reliability.
Can one unit cool multiple rooms?
Not effectively—unless it’s a properly designed multi-zone system.
How long do mini splits last?
Typically 10–15 years with proper installation and setup.
What makes GWIN different?
It combines homeowner installation with professional commissioning.
Do I need special tools?
No—specialized HVAC tools are handled during commissioning.
Next Step
Before you buy, get clarity.
GWIN can help you:
- Size your system correctly
- Plan your installation
- Avoid common mistakes
No pressure—just solid information so you can make the right call.
Self-Install SAVINGS.
PRO RELIABILITY.
Commercial Strength.
That's the GWIN difference. Find the right system for your home today and start saving thousands.
Get real help from real humans who know GWIN systems.
